You can whip this up in 15 minutes or less!
I remember the first time I desperately needed a cookie but had almost zero groceries in the house. I was digging through my pantry when I discovered that the magic of peanut butter isn’t just for sandwiches, it’s actually the base for the most glossy, decadent cookies I’ve ever made. While there are plenty of complicated recipes out there involving flour sifting and butter softening, I wanted something that was perfectly refreshing in its simplicity and yet totally crave-worthy.
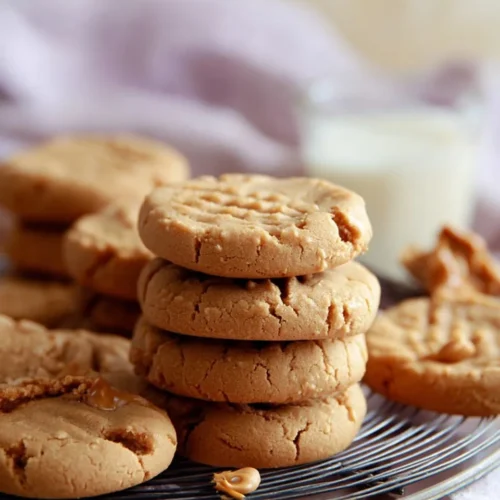
Get ready, because this is about to become your go-to “emergency cookie” recipe. These 4-ingredient peanut butter cookies are naturally flourless, making them a fantastic gluten-free option that doesn’t compromise on taste. We are capitalizing on the massive surge in peanut butter cookies we are seeing in 2025, so you are right on trend!

Table of Contents
4-Ingredient Peanut Butter Cookies (Easy & Gluten-Free)
Ingredients
- 1 cup smooth peanut butter creamy brands like Jif or Skippy work best; avoid natural no-stir varieties
- ½ cup granulated sugar
- ½ cup packed light brown sugar
- 1 large egg at room temperature
- 1 teaspoon baking soda
Instructions
- Get Ready: Position a rack in the upper third of your oven and preheat to 350°F (175°C). Line a rimmed baking sheet with parchment paper for easy cleanup.
- Mix the Base: In a large bowl, combine the peanut butter, granulated sugar, and brown sugar. Beat with a mixer or wooden spoon for about 2 minutes until smooth.
- Finish the Dough: Add the room temperature egg and baking soda. Mix for another 2 minutes until the dough is cohesive. It may look slightly crumbly, but it should hold together when pressed.
- Shape & Pattern: Scoop walnut-sized balls (about 1 tablespoon) and roll them between your palms. Place them on the baking sheet 2 inches apart. Use a fork to press a criss-cross pattern into each cookie, flattening them to about ½-inch thickness.
- Bake: Slide them into the oven and bake for 10-12 minutes, until they are lightly golden around the edges.
- Cool: Let the cookies rest on the hot baking sheet for 2 full minutes to set (don’t skip this!). Transfer to a wire rack to cool completely.
Notes
- Peanut Butter Choice: Opt for standard creamy peanut butter. Natural varieties can cause the cookies to spread too much or become oily.
- Storage: Store leftovers in an airtight container at room temperature for up to 4 days.
- Freezing: You can freeze the unbaked dough balls for up to 3 months. Bake from frozen by adding 1-2 extra minutes to the cook time.
Nutrition
Why These Are the Easiest Peanut Butter Cookies You’ll Ever Make
Let’s be honest: sometimes you just need a cookie now. What I love about this recipe is that it eliminates all the anxiety associated with traditional baking. There’s no flour to measure (so no gluten!), no butter to cream, and you don’t even need a mixer if you don’t want to use one.
I recommend this specific version because it settles the “3-ingredient vs. 4-ingredient” debate once and for all. While the 3-ingredient version is acceptable, adding an extra pinch of baking soda significantly improves the texture and flavor, resulting in a chewy cookie rather than a dense one. Additionally, using a specific blend of sugars creates a depth of flavor that simple white sugar cannot match.
4 Simple Ingredients You Already Have
Here is everything you need to get started. Opt for untreated ingredients where possible, but honestly, this recipe is very forgiving!
- 1 cup smooth peanut butter: My personal preference is a regular creamy brand like Jif or Skippy for the best texture, rather than natural “no-stir” varieties.
- ½ cup granulated sugar: This adds the classic crisp edges we all love.
- ½ cup packed light brown sugar: This is the secret to a chewy center and deep molasses flavor.
- 1 large egg: Use this at room temperature to ensure it emulsifies perfectly with the oils in the peanut butter.
- 1 teaspoon baking soda: The magic lifter that prevents your cookies from being heavy hockey pucks.
(Note: While some count the sugars as one “sweetener” component to maintain the “4-ingredient” moniker, I prefer to be precise, as using both sugars is a game-changer!)
Step-by-Step Instructions
Here are the steps to cookie nirvana. It’s perfectly straightforward!
1. Prepare Your Workspace
First, position a rack in the upper third of your oven and preheat it to 350°F (175°C). I recommend lining a rimmed baking sheet with parchment paper. This simple prep step makes all the difference in achieving perfectly baked cookies and ensures a super easy cleanup.
2. Mix the Dough
In a large mixing bowl, combine the peanut butter, granulated sugar, and brown sugar. You can use a wooden spoon or an electric hand mixer for this. Beat the mixture for about 2 minutes, until it is smooth and well-blended.
Next, add the room temperature egg and baking soda. Mix for an additional 2 minutes, until everything is thoroughly incorporated. The dough may look slightly crumbly at first, but don’t worry, it should hold together easily when pressed. The water’s starch combines with the olive oil (or, in this case, peanut oil) to make a glossy, decadent dough!
3. Shape the Cookies
Scoop walnut-sized portions of dough (about one tablespoon each) and roll them between your palms to form smooth balls. Place them on your prepared baking sheet, spacing them about 2 inches apart.
Now for the signature move: Using the tines of a fork, press down on each cookie to create the classic criss-cross pattern, flattening them to about ½-inch thickness. This isn’t just for looks; it helps the dense dough bake evenly.

4. Bake to Golden Perfection
Slide the baking sheet into your preheated oven. Bake for 10-12 minutes, or until the cookies are lightly golden around the edges with those attractive cracks across the top.
5. Cool and Serve
When you pull them out, the cookies will appear soft. Let them rest on the baking sheet for 2 minutes to set. This is crucial! Then, transfer them to a wire cooling rack. They will firm up beautifully as they cool.

Tips for Perfect Cookies Every Time
I’ve made these gluten-free peanut butter cookies dozens of times, and here are a few things I’ve learned along the way to guarantee success:
- Stick to Commercial Brands: As mentioned, brand recommendations suggest using regular creamy peanut butter, such as Jif or Skippy. Natural peanut butters often have oil separation that can lead to spreading problems or dry cookies.
- Room Temperature Egg: If your egg is too cold, it can shock the peanut butter oil, making the dough harder to mix. If you forgot to take it out, place the egg in a bowl of warm water for 5 minutes!
- Don’t Overbake: These cookies go from “perfectly chewy” to “dry” very quickly. Pull them out when they still look slightly underdone in the center.
- The Sugar Mix: You can use all white sugar if you’re in a pinch, but the brown sugar adds moisture. If you only have white sugar, consider adding a teaspoon of molasses, if available.

Variations & Add-ins
Feel free to get creative!
- Chocolate Lovers: Fold in ½ cup of semi-sweet chocolate chips for a classic combo.
- Salty-Sweet: Sprinkle a little flaky sea salt on top immediately after they come out of the oven.
- Crunch Factor: If you love texture, you can opt for crunchy peanut butter, but keep in mind the dough might be a bit more crumbly.
Storage & Freezing Instructions
- Room Temp: Store leftovers in an airtight container at room temperature for up to 4 days.
- Freezing: You can freeze the dough balls (before baking) for up to 3 months. Just add an extra minute to the baking time when cooking from frozen.
What to Serve With Peanut Butter Cookies
These cookies are bold and rich, so they pair perfectly with things that cut through that density.
- Ice Cold Milk: It’s a cliché for a reason; nothing beats the creamy texture of milk against the crumbly peanut butter.
- Vanilla Ice Cream: Sandwich a scoop of vanilla bean ice cream between two cookies for an instant, crowd-pleasing dessert.
- Dark Roast Coffee: The bitterness of a good coffee balances the sweetness of the brown sugar beautifully.
Frequently Asked Questions
Can I use natural peanut butter for this recipe?
I recommend avoiding natural peanut butter for this specific recipe. The oil separation in natural brands can mess with the structure, leading to cookies that spread too much or turn out crumbly. Stick to standard creamy brands, such as Jif or Skippy, for consistent results.
Why are my cookies crumbly?
Suppose your easy peanut butter cookies are falling apart; it’s usually because the dough was too dry or they were overbaked. Ensure you are measuring your flour (or in this case, sugar and PB) correctly and not baking past the golden-edge stage. Also, let them cool in the pan for that vital 2 minutes to set!
Can I freeze the dough for later?
Absolutely! This is a great, quick peanut butter cookie recipe for meal prep. Roll the dough into balls, freeze them on a sheet pan, and then transfer them to a bag. You can bake them straight from the freezer, just adding 1-2 minutes to the bake time.
I hope you love these 4-ingredient peanut butter cookies as much as I do! They are the perfect solution when you need a sweet treat without the hassle of a whole baking project. Give them a try, and let me know in the comments if you added any fun mix-ins. I’d love to hear your take on them!