Get ready to turn that leftover holiday bone into absolute liquid gold! There is a moment every year, usually right after a big holiday feast, where I find myself staring at a massive, meaty bone and thinking, “I cannot let this go to waste.” That is exactly how I fell in love with this split pea soup with ham bone. While you can certainly buy a ham hock specifically for this, using leftovers makes this recipe feel like a triumphant, savvy kitchen hack.
It is perfectly comforting, rich with smoky flavor, and yet totally crave-worthy. I used to be intimidated by soups that required “long simmers,” fearing they were complicated. But here is the genuine discovery: this soup practically makes itself. You throw everything in the pot and let the magic happen. The result is a glossy, thick texture that warms you from the inside out. If you are looking for the ultimate “set it and forget it” meal that packs a punch of flavor, you have found it.

Table of Contents
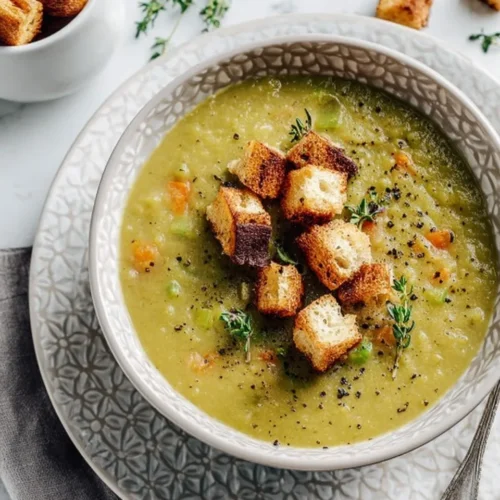
Hearty Split Pea Soup with Ham Bone
Ingredients
For the Soup Base:
- ¼ cup unsalted butter or olive oil
- 2 cups chopped onion approx. 1 large
- 1 cup diced carrot ¼-inch dice
- 1 cup diced celery ¼-inch dice
- 2 cloves garlic minced
- ¼ teaspoon kosher salt plus more to taste
- ½ teaspoon freshly-ground black pepper
For the Soup:
- 1 pound dried green split peas rinsed and sorted
- 1 meaty ham bone or 2 smoked ham hocks
- 1 large bay leaf
- 2 teaspoons fresh thyme leaves divided
- 6 cups low-sodium chicken stock
- 2 cups water
- 1 cup diced cooked ham optional, for finishing
For Serving:
- Buttery garlic croutons
- Crusty bread
Instructions
- Sauté the Aromatics: In a large pot or Dutch oven, melt the ¼ cup butter over medium heat. Add 2 cups onion, 1 cup carrot, 1 cup celery, ¼ teaspoon salt, and ½ teaspoon black pepper. Cook for 5-8 minutes until softened. Add 2 cloves minced garlic and cook for 1 minute until fragrant.
- Combine Ingredients: Stir in the 1 pound split peas, coating them in the butter. Add the ham bone, bay leaf, and 1 teaspoon fresh thyme. Pour in 6 cups chicken stock and 2 cups water.
- Simmer: Bring to a boil, then reduce heat to low. Simmer uncovered for 60-90 minutes, stirring occasionally to prevent sticking. The soup is done when the peas have broken down into a thick puree.
- Shred the Meat: Remove the ham bone. Let cool slightly, then shred any meat from the bone and return it to the pot. Discard the bone and bay leaf. (If adding extra diced ham, stir it in now).
- Finish & Serve: Stir in the remaining 1 teaspoon fresh thyme. Taste and adjust salt and pepper. Serve hot with croutons.
Nutrition
Why This Split Pea Soup Recipe Works
I have tried a dozen variations of pea soup, but this method delivers the best results for a few key reasons. First, we build a flavor foundation by sautéing the mirepoix (onions, carrots, celery) in butter, rather than simply adding them raw. This adds a sweetness that balances the salty, smoky flavor of the ham.
Second, this recipe utilizes the natural starch of the split peas to thicken the broth. As they break down, they create a silky, decadent consistency without needing any heavy cream or flour. Finally, simmering the bone right in the broth extracts all that incredible collagen and marrow, giving the soup a body and richness that boxed stock can’t compete with. It is an honest, rustic, and profoundly satisfying dish.
Ingredients for Ham Bone Split Pea Soup
Here is what you need to whip up this comfort classic. I recommend using fresh vegetables for the best texture, but I have definitely used frozen mirepoix in a pinch!
- ¼ cup unsalted butter (or olive oil)
- 2 cups chopped onion (about one large onion)
- 1 cup diced carrot (¼-inch dice, about two medium carrots)
- 1 cup diced celery (¼-inch dice, about two stalks)
- 2 cloves garlic, minced
- 1 pound dried green split peas, rinsed and sorted
- 1 meaty ham bone (leftover from a holiday ham) OR 2 smoked ham hocks
- 1 large bay leaf (or two small)
- 2 teaspoons fresh thyme leaves, divided
- 6 cups chicken stock (low-sodium is best since ham is salty)
- 2 cups water
- 1 cup diced cooked ham (optional, for adding extra meatiness at the end)
- Seasoning: ¼ to 1 teaspoon kosher salt and ½ teaspoon freshly-ground black pepper (to taste)
How to Make Split Pea Soup with Ham Bone (Step-by-Step)
Get ready, because this process is incredibly straightforward. The hands-on time is minimal, leaving you free to relax while your kitchen begins to smell amazing.
1. Sauté the Aromatics
In a large pot or Dutch oven, melt the butter over medium heat until the foaming subsides. Add the chopped onion, diced carrot, diced celery, ¼ teaspoon salt, and ½ teaspoon black pepper. Cook, stirring occasionally, for 5-8 minutes until the vegetables are softened and the onions become translucent. Add the minced garlic and cook for an additional minute, until fragrant and aromatic. This aromatic base is the foundation of your soup’s flavor, so take your time with this step.
2. Add Split Peas and Ham Bone
Stir the rinsed and sorted split peas into the pot, coating them with the buttery vegetables. Add your meaty ham bone (or ham hocks), bay leaf, and one teaspoon of the fresh thyme leaves. Pour in the chicken stock and water, stirring to combine everything. The liquid should cover the ingredients generously.
3. Simmer to Perfection
Bring the soup to a boil over medium-high heat. Once it is bubbling, reduce the heat to maintain a gentle simmer. Leave the pot uncovered and let it simmer for 60-90 minutes, stirring occasionally to prevent sticking. As the split peas cook down, they’ll naturally thicken the soup into a creamy, textured puree. Stir more frequently as the soup thickens, and add a little extra stock or water if it becomes too thick for your liking. The split peas are done when they’ve broken down completely, and the soup has a rich, thick consistency.
4. Remove Bone & Add Meat
After the split peas have cooked down (about 60-90 minutes), carefully remove the ham bone from the pot. Let it cool slightly; you don’t want to burn your fingers! Then, shred any remaining meat off the bone, discarding any skin, cartilage, and the bone itself. Return the shredded ham to the soup. If you have extra diced ham you want to use, add it now during the last 15 minutes of cooking to warm through without drawing excess salt into the soup.
5. Final Seasoning
Remove and discard the bay leaf. Stir in the remaining one teaspoon of fresh thyme leaves for a bright, herbaceous finish. Taste the soup and season with additional salt if needed. Keep in mind that ham bones can be pretty salty, so add them conservatively and adjust to your taste preference. Add freshly-ground black pepper to taste.
6. Serve & Enjoy
Ladle the hot soup into bowls and top generously with buttery garlic croutons for an excellent crunchy contrast to the creamy soup. Finish with a few cracks of black pepper and extra-fresh thyme, if desired.

Tips for the Best Split Pea Soup
Over the years, I have learned a few tricks to make this split pea soup with ham bone foolproof. Here are my top tips for success:
- Manage the Salt: I cannot stress this enough, ham is salty!. I always recommend using low-sodium chicken stock and holding back on adding extra salt until the very end. You can always add more, but you can’t take it out.
- Texture Control: My personal preference is a soup that is thick enough to hold up a spoon. However, if you prefer a thinner broth, stir in an extra cup of water or stock at the end. Conversely, if it’s too thin, let it simmer uncovered for another 15 minutes.
- The “Sort” Step: When prepping your peas, dump them onto a baking sheet to “sort” them. You are looking for small stones or shriveled peas. It takes 30 seconds but saves you from a crunchy surprise!
- Vegetarian Swap: Although this recipe focuses on ham bone soup with split peas, you can easily make it vegetarian by using vegetable stock and swapping the ham for liquid smoke and smoked paprika to achieve that savory depth.
- Instant Pot Variation: Short on time? You can whip this up in a pressure cooker! Sauté your veggies, then add the remaining ingredients and cook on High Pressure for 15 minutes with a natural release.
What to Serve With Split Pea Soup with Ham Bone
This soup is hearty enough to be a meal on its own, but pairing it with the right side dish truly elevates the experience.
- Crusty Bread: A loaf of warm sourdough or a baguette is non-negotiable for me. You need something sturdy to dunk into that thick, green goodness.
- Grilled Cheese: Is there a better duo than soup and a grilled cheese sandwich? Opt for a sharp cheddar or Gruyère to cut through the richness of the peas.
- Fresh Green Salad: Since the soup is so savory and rich, a crisp arugula salad with a zippy lemon vinaigrette provides a perfect, refreshing counterpoint.
- Roasted Root Vegetables: For an extra cozy touch, a side of roasted parsnips or sweet potatoes pairs beautifully.

Frequently Asked Questions
How long does split pea soup with ham bone last?
This soup stores incredibly well! It will last for 3-4 days in an airtight container in the refrigerator. In fact, it often tastes even better the next day as the flavors have time to meld together. Keep in mind it will thicken significantly in the fridge, so you might need a splash of water when reheating.
Do you need to soak split peas?
No, you do not! Unlike beans, split peas cook relatively quickly and do not require overnight soaking. You rinse them, sort them, and toss them in the pot. This is one of the reasons I love this recipe for a low-stress dinner.
Can you freeze split pea soup?
Absolutely. This soup freezes beautifully for up to 3 months. Let it cool completely, then transfer it to freezer-safe bags or containers. Thaw it in the fridge overnight before reheating on the stove. It is the perfect meal prep hero to have stashed away for a rainy day.
There is something deeply grounding about making a pot of split pea soup with a ham bone. It connects us to a tradition of resourcefulness and simple, honest cooking. I hope this recipe brings as much warmth to your kitchen as it does to mine. If you try it, I would love to hear how it turned out. Did you stick to the classic or add your own twist?
Let me know in the comments below, and happy cooking!