There is honestly nothing sadder in the kitchen than eagerly peeling a boiled egg, only to have half the whites stick to the shell, leaving you with a cratered, sad-looking snack. I used to avoid making deviled eggs entirely because I dreaded the peeling process so much! But after years of trial and error (and way too many mangled egg whites), I finally found the method that works every single time.
Get ready, because this is the recipe for perfect hard boiled eggs. We aren’t just looking for cooked eggs here; we want tender whites, creamy bright yellow yolks without that dreaded gray-green ring, and shells that practically slip off on their own. Whether you are prepping a high-protein breakfast for the week or whipping up a classic Cobb salad, this method is a total game-changer.
The secret isn’t actually boiling them the whole time; it’s about gently steaming them in hot water and then shocking them with cold water right after. It may sound technical, but it is actually incredibly straightforward. You can master this in one go, and your mornings are about to get a whole lot smoother!

Table of Contents
Perfect Hard Boiled Eggs
Ingredients
- 12 Large eggs or as many as you need—works for 2 to 12+
- Cold water enough to cover eggs by 1 inch
- Ice cubes 2-3 cups for the ice bath
- Optional: Flaky sea salt black pepper, or Everything Bagel seasoning for serving
Instructions
- Arrange & Cover: Place your eggs in a single layer at the bottom of a pot. Pour in enough cold water to cover the eggs by at least 1 inch.
- Bring to a Boil: Place the pot over high heat and bring the water to a vigorous, rolling boil.
- Turn Off & Cover: The moment the water reaches a rolling boil, turn off the heat (remove from burner if electric) and immediately cover with a lid.
- Let Sit: Set a timer and let the eggs cook in the hot water.
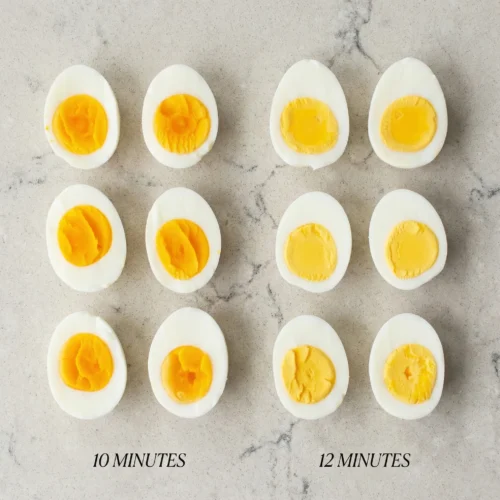
- 10 minutes: Creamy, slightly soft center.
- 12 minutes: Firm, pale yellow yolk (classic hard boiled).
- Ice Bath: While eggs cook, prepare a bowl with cold water and ice. When the timer beeps, transfer eggs immediately to the ice bath.
- Chill & Peel: Let eggs cool in the ice for at least 14 minutes (this is the secret to easy peeling!). Crack gently all over, peel under cool water, and enjoy!
Notes
- Storage: Store unpeeled hard boiled eggs in the refrigerator for up to 7 days.
- The Ice Bath is Key: Do not skip the ice bath! This “shocks” the egg, stopping the cooking process to prevent the green ring and shrinking the egg slightly for easy peeling.
- Older Eggs: If you can, use eggs that are 1-2 weeks old rather than fresh from the farm, they tend to peel easier.
Nutrition
Ingredients You’ll Need
The beauty of this recipe lies in its simplicity. You don’t need fancy gadgets or expensive tools; just a few basics that you likely already have.

- Large eggs: You can boil as few as two or as many as a dozen at once. (Note: Older eggs actually peel better than brand new farm-fresh ones!)
- Cold water: You need enough to cover the eggs by about an inch.
- Ice cubes: This is a non-negotiable requirement for the ice bath.
- Optional seasonings: Flaky sea salt, freshly cracked black pepper, or Everything Bagel seasoning for serving.
How to Make Perfect Hard-Boiled Eggs
Here are the steps to achieve that glossy, tender texture and easy-peel shell. It’s all about timing and temperature control.
1. Arrange and Cover First, grab a medium or large pot. Place your eggs in a single layer at the bottom of the pan. Be sure not to stack them on top of each other, as they need room to cook evenly. If you are feeding a crowd and need more eggs, opt for a larger pot rather than crowding a small one. Gently pour in cold water until it covers the eggs by at least 1 inch. Starting with cold water (rather than dropping them into boiling water) helps prevent the shells from cracking due to thermal shock.
2. Bring to a Rolling Boil. Place the pot over high Heat. You are looking for a vigorous, rolling boil here, with big bubbles breaking the surface and water churning energetically. Depending on your stove and pot size, this usually takes about 7 to 10 minutes. Keep an eye on it; you don’t want to walk away and let it boil vigorously for too long!

3. Turn off the Heat and cover. This is the magic moment. As soon as that water hits a full rolling boil, immediately turn off the Heat. If you are using an electric stove with coils that stay hot, move the pot to a cool burner. Cover the pot quickly with a tight-fitting lid. This traps the Heat and allows the eggs to cook gently in the hot water, which keeps the whites tender rather than rubbery.
4. Let the Eggs Set Now. Set your timer. This is where you get to choose your own adventure based on how you like your yolks:
- 10 minutes: This gives you a creamy, vibrant yellow yolk with a slightly softer center.
- 12 minutes: This delivers a completely firm, pale yellow yolk with that classic hard-boiled texture, perfect for egg salad. Don’t guess at the time; use your phone’s timer! Precision is key to achieving the ideal hard-boiled egg cooking time.
5. The Essential Ice Bath While the eggs are taking their hot bath, grab a large bowl and fill it with cold water and plenty of ice cubes. When your timer goes off, use a slotted spoon to transfer the eggs immediately from the hot water into the ice bath. You want to shock them. This stops the cooking process instantly, which is exactly how you prevent that unappetizing green ring around the yolk.

6. Chill and Peel Let the eggs hang out in the ice bath for at least 14 minutes. I know it’s tempting to start peeling early, but cooling them completely shrinks the egg slightly inside the shell, making them an easy-peel hard-boiled egg. Once chilled, gently tap the egg on the counter to crack the shell all over. Start peeling at the wide end (where the air pocket is), and the shell should slip right off. Rinse off any tiny shell bits, and you are ready to eat!

Tips for the Best Results
While this method is pretty foolproof, a few extra tricks can ensure you get the best way to boil eggs every single time.
- The Age Factor: Believe it or not, super-fresh eggs are harder to peel because the pH level causes the white to cling to the inner membrane. Use eggs that have been in your refrigerator for one to two weeks. If you only have fresh eggs, don’t worry, the ice bath helps significantly!
- The “5-5-5” Alternative: If you own a pressure cooker, you may have heard of the 5-5-5 rule (5 minutes of high pressure, 5 minutes of natural release, and 5 minutes of an ice bath). While that works for hard-boiled eggs in an Instant Pot, the stovetop method yields more tender whites.
- No Green Rings: That gray-green ring is actually a chemical reaction caused by overcooking. By removing the Heat and using the egg ice bath method, you ensure the yolk stays bright yellow and creamy.
- Storage: If you are meal prepping, you can store these eggs unpeeled in the refrigerator. How long do hard-boiled eggs last? They are suitable for up to 7 days! I recommend peeling them right before eating to keep them fresh, but you can also peel them ahead of time and store them in an airtight container with a damp paper towel for 2-3 days.
- Troubleshooting Cracks: If an egg cracks while boiling, add a splash of vinegar to the water. It helps the whites coagulate faster and seals the crack.
What to Serve With Hard-Boiled Eggs
Hard-boiled eggs are the ultimate versatile protein. While I often eat them with just a pinch of salt and pepper for a quick snack, they can easily be the star of a meal.
- Avocado Toast: Slice the egg and layer it over smashed avocado on sourdough. Add some red pepper flakes and a drizzle of olive oil for a cafe-style breakfast at home.
- Classic Salads: They are essential for a hearty Cobb salad or a traditional Niçoise salad. The creamy yolk perfectly balances the acidity of vinaigrettes.
- Ramen Upgrades: While a soft-boiled egg is traditional, a 10-minute egg is delicious when halved and floated on top of a hot bowl of spicy ramen.
- Deviled Eggs: Naturally, this is the go-to use. Since these peel so cleanly, your deviled eggs will look professional rather than jagged!

FAQs
What is the trick to perfect hard-boiled eggs?
The real trick is the “carryover cooking” method. Instead of boiling the eggs continuously, which makes them rubbery, you bring the water to a boil, turn off the Heat, and let them sit covered. This, combined with an immediate ice bath, ensures tender whites and creamy yolks every time.
How long does it take to boil an egg perfectly hard?
Once the water reaches a rolling boil and you turn off the Heat, it takes precisely 10 to 12 minutes. Use 10 minutes for a creamier yolk and 12 minutes for a firm, lighter yolk. Don’t forget to allow for the cooling time in the ice bath, which should be approximately 14 minutes for the most effortless peeling.
Conclusion
Mastering the perfect hard-boiled egg is one of those small kitchen victories that makes life just a little bit easier. No more losing half the egg white to the shell or chewing on rubbery, overcooked yolks. With this simple method, you get creamy, delicious results that are perfect for snacks, salads, or breakfast on the go.
Give this method a try next time you need a protein boost! I’d love to hear how it worked for you. Did you get that perfect, easy peel? Let me know in the comments below!