You know that specific moment when you’re craving the satisfying, loud crunch of fried chicken, but the thought of standing over a pot of hot oil and dealing with the splatter afterward just isn’t happening? I’ve been there so many times on busy Tuesdays. I used to think the oven could never compete with the deep fryer, but after a lot of testing (and a few soggy disasters), I finally cracked the code. This Crispy Oven-Baked Chicken Breast recipe delivers the golden, shatteringly crisp texture you want, while leaving your kitchen clean and your dinner ready in just half an hour!
It’s genuinely one of those “how is this so easy?” meals. By using a high-heat method and a specific breading technique, we lock in the juices while the outside turns golden. Whether you need a quick protein for a salad or a main event for a family dinner, this recipe is a total game-changer for weeknight cooking. It’s perfectly savory, incredibly juicy, and packs a punch of brightness from the fresh lemon zest.

Table of Contents
Crispy Oven-Baked Chicken Breast
Ingredients
For the Chicken:
- 1 lb 500 g boneless, skinless chicken breast
- Oil spray avocado or olive oil recommended
For the Breading Station:
- ¾ cup 90 g all-purpose flour
- 1 teaspoon paprika
- Zest of 1 lemon freshly grated
- ½ teaspoon salt
- ¼ teaspoon freshly ground black pepper
- 1 large egg beaten
- 1 cup 80 g panko breadcrumbs
For Garnish (Optional):
- 2 tablespoons fresh parsley leaves finely chopped
- Lemon slices or wedges
Instructions
- Prep & Preheat: Preheat your oven to 425°F (220°C). Line a large baking sheet with parchment paper to prevent sticking.
- Prepare the Chicken: Pat the chicken breasts completely dry with paper towels. Slice each breast in half horizontally (lengthwise) to create thinner, even cutlets about ½ to ¾ inch thick.
- Set Up Breading Station: Arrange three shallow bowls. In the first, whisk together flour, paprika, lemon zest, salt, and pepper. In the second, beat the egg. In the third, add the panko breadcrumbs.
- Coat the Chicken: Dredge each cutlet in the flour mixture (shake off excess), dip into the beaten egg, and press firmly into the panko breadcrumbs to coat evenly. Arrange on the prepared baking sheet.
- Spray & Bake: Space the chicken apart and generously spray the tops with cooking oil. Bake for 10 minutes.
- Flip & Finish: Flip the chicken, spray the other side with oil, and bake for another 12 minutes (or until golden brown).
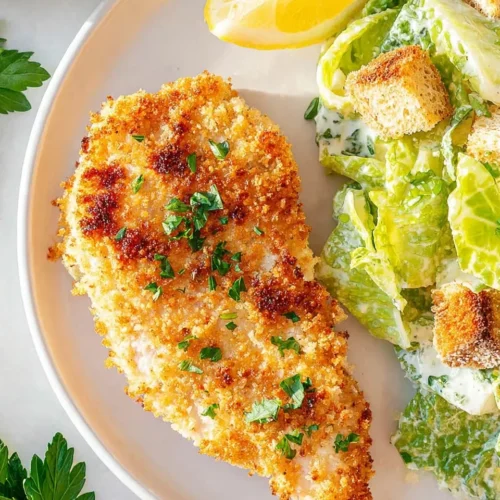
- Serve: Chicken is done when it reaches an internal temperature of 165°F (75°C). Garnish with parsley and lemon wedges and serve immediately.
Notes
- Crispiness Trick: Don’t be shy with the oil spray! It interacts with the panko in the high heat to create that “fried” texture.
- Make it Stick: Press the panko gently but firmly into the meat to ensure a solid crust.
- Storage: Best eaten immediately for maximum crunch. Leftovers can be stored in an airtight container for up to 3 days and reheated in an oven or air fryer.
Nutrition
Ingredients
Here is everything you need to whip this up. I’ve kept the list simple because weeknight dinners shouldn’t be complicated!

For the Chicken:
- 1 lb (500 g) boneless, skinless chicken breast (about 2 large breasts)
- Oil spray (essential for coating, I recommend avocado or olive oil spray)
For the Breading Station:
- ¾ cup (90 g) all-purpose flour
- 1 teaspoon paprika (adds great color and subtle warmth)
- Zest of 1 lemon, freshly grated (don’t skip this, it adds a zippy brightness!)
- ½ teaspoon salt
- ¼ teaspoon freshly ground black pepper
- 1 large egg, beaten
- 1 cup (80 g) panko breadcrumbs (Panko is crucial here for that superior crunch compared to regular crumbs)
For Garnish (Optional):
- 2 tablespoons fresh parsley leaves, finely chopped
- Lemon slices or wedges for serving
Instructions
Get ready, because this comes together faster than you might think. Here are the steps to achieving that perfect crunch without the fryer.
1. Heat Things Up Start by preheating your oven to 425°F (220°C). This high temperature is the absolute secret to success here; a lower temperature will bake the breading rather than crisping it. Line a large baking sheet with parchment paper now, so cleanup is a breeze later.
2. Prep the Chicken While the oven warms up, pat your chicken breasts completely dry with paper towels. Removing that excess moisture is vital because it helps the flour mixture stick properly. Next, grab a sharp knife and carefully slice each breast in half horizontally (lengthwise) to create thinner, even cutlets about ½ to ¾ inch thick. I love doing this because thinner pieces cook much more evenly and give you a better ratio of crispy coating to juicy meat!
3. Set Up Your Station. Arrange three shallow bowls or plates in a row to create an assembly line.
- Bowl 1: Whisk together the flour, paprika, lemon zest, salt, and black pepper. The zest here really wakes up the flavor profile.
- Bowl 2: Beat the egg until it’s smooth.
- Bowl 3: Pour in the panko breadcrumbs.
4. Coat and Press Working with one piece at a time, dredge the chicken in the flour mixture first, shaking off any excess. Then, dip it into the beaten egg, letting the excess drip back into the bowl. Finally, and this is the fun part, press the chicken firmly into the panko breadcrumbs. You want to press gently but with intention to ensure those crumbs adhere to every inch. Place each breaded cutlet onto your prepared baking sheet.
5. The “Faux-Fry” Secret Once all your pieces are arranged (make sure they aren’t touching so air can circulate!), generously spray the tops of each piece with your cooking oil. Do not skip this step! The oil spray interacts with the panko in the high heat to create that gorgeous golden color and fried-like texture we’re after.
6. Bake to Perfection Slide the baking sheet into the oven and bake for 10 minutes. At this point, the bottoms should be turning golden. Carefully flip each piece using tongs, and give the newly exposed side a quick spray with oil.

7. Finish and Serve Return the tray to the oven for another 12 minutes, or until the coating is deeply golden brown. Thicker pieces might need an extra 2-3 minutes, so keep an eye on them. You’ll know they are done when an instant-read thermometer inserted into the thickest part of the meat reads 165°F (75°C). Transfer them to a platter, sprinkle with parsley, and serve immediately while they are hot and crunchy!

Tips & Variations for Success
I’ve made this easy, crispy baked chicken breast recipe dozens of times, and along the way, I’ve picked up a few tricks to make it foolproof.
- Make it Stick: If you find you’re running out of egg wash, whisk in a teaspoon of water or milk to stretch it. If you want to avoid eggs entirely, I’ve had success brushing the chicken with a thin layer of mayonnaise or Greek yogurt before breading; it keeps the meat incredibly moist!
- Spice it Up: While I love the lemon zest for a fresh kick, you can easily customize the flour mixture. Try adding garlic powder, onion powder, or even dried Italian herbs for a different flavor profile. It’s an excellent canvas for whatever spices you have in your pantry.
- Storage Reality Check: I’ll be honest with you, this chicken is best enjoyed fresh out of the oven to maximize that crunch. However, if you are using this for meal prep, store it in an airtight container for up to 3 days. To reheat, pop it back in the oven or an air fryer for a few minutes; microwaves will make the breading soft.
- Gluten-Free Option: If you need a gluten-free version, swap the flour for a 1:1 gluten-free flour blend and use gluten-free panko or crushed corn flakes. It still gets totally crave-worthy and crisp!

What to Serve With Crispy Chicken
Since this main dish is relatively hands-off once it hits the oven, you have plenty of time to whip up a side dish. Here are a few pairings that I think work beautifully:
- A Bright Salad: The chicken is savory and crunchy, so I love pairing it with a zippy arugula salad dressed in lemon vinaigrette. The acid cuts right through the richness.
- Roasted Vegetables: Since your oven is already hot at 425°F, why not throw in a tray of asparagus or broccoli? Just toss them with olive oil, salt, and pepper, and roast them alongside the chicken for the last 15 minutes.
- Classic Comfort: If you want a heartier meal, serve this over a bed of mashed potatoes or with a side of mac and cheese. It’s pure comfort food without the heaviness of fried meat.
- Sandwiches: This makes for the best crispy chicken breast recipe for sandwiches! Toast a brioche bun, add some slaw and pickles, and you’ve got a restaurant-quality sandwich at home.

Frequently Asked Questions
How do I crisp up a chicken breast in the oven?
The secret lies in two things: high heat and oil. Baking at 425°F (220°C) mimics the intense heat of a fryer. Combined with a generous spray of cooking oil directly on the breadcrumbs, the heat “fries” the coating in the oven, giving you that golden, crunch-tastic exterior without submerging the meat in fat.
Is it better to bake chicken at 350 or 400 for how long?
For breaded chicken like this, definitely opt for higher heat! Baking at 350°F often results in a pale, soggy coating because the chicken releases moisture before the crust can crisp up. I recommend 400°F to 425°F. At 425°F, thin cutlets usually take about 20-22 minutes total to reach perfection.
What temperature for crispy baked chicken?
You want to pull the chicken out when its internal temperature reaches 165°F (75°C). I highly recommend using an instant-read thermometer. It eliminates the guesswork and ensures you don’t overcook the meat, keeping your juicy, crispy chicken breast recipe, well, juicy!
Conclusion
I really hope this Crispy Oven-Baked Chicken Breast becomes a new staple in your kitchen rotation! It’s one of those recipes that proves you don’t need a deep fryer or hours of prep to make something that tastes indulgent and satisfying.
If you try this out, I’d love to hear how it went! Did you stick with the lemon zest, or did you try your own spice blend? Let me know in the comments below. I’m always inspired by how you adapt these recipes to make them your own. Happy cooking!