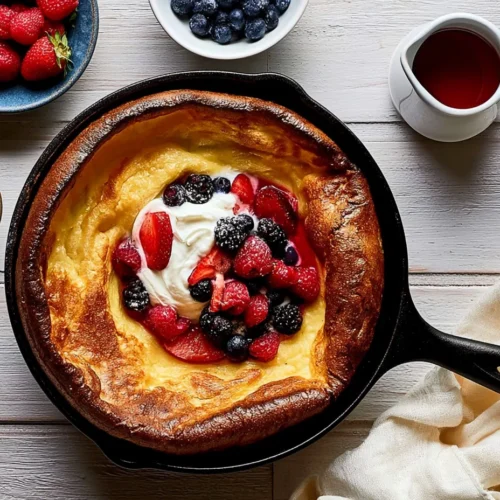
You can whip this up in just a few minutes of active prep time, and it looks spectacular right out of the oven! I was hosting a casual brunch recently when I came up with my current routine for this easy Dutch baby pancake. Though classic stovetop pancakes are always a solid choice, I wanted something a little more dramatic that required zero standing over a hot griddle. That’s the magic of this baked beauty. It delivers a deeply golden, beautifully wrinkled crust with a tender, custard-like center that is totally crave-worthy.
A Dutch Baby Pancake, sometimes called an oven pancake or a German pancake, is a wonderfully light, eggy batter baked in a hot skillet until it billows dramatically over the edges. I was actually quite inspired to learn that this specific style has an authentic origin story linked directly to Manca’s Café in Seattle. It’s fascinating how a regional specialty becomes a beloved classic! Get ready to embrace this totally hands-off cooking method. The batter comes together effortlessly, leaving you free to sip your coffee while the oven does all the heavy lifting.

Table of Contents
Easy Dutch Baby Pancake
Ingredients
For the Batter:
- 3 large eggs at room temperature
- ¾ cup 94g all-purpose flour
- ¾ cup 180ml whole milk, at room temperature (any dairy or non-dairy milk works)
- 1 teaspoon lemon zest or ½ teaspoon ground cinnamon
- 2 tablespoons 25g granulated sugar
- ½ teaspoon vanilla extract
- 1 pinch salt
For the Pan:
- 3 tablespoons 43g unsalted butter
For Serving (Sweet Version):
- 2 tablespoons confectioners’ sugar for dusting
- Fresh berries maple syrup, and/or whipped cream
For Serving (Savory Version – Optional):
- 2 tablespoons sour cream
- 2 tablespoons fresh chives chopped
- Halved cherry tomatoes fresh arugula, smoked salmon
Instructions
- Blend the Batter: Place the eggs in a blender and blend on medium-high speed for about 45 seconds, until they are genuinely frothy and fluffy. Don't rush this step, as the air you build here is what starts the lift! Add the flour, milk, lemon zest, sugar, vanilla, and salt. Blend again until everything is smooth and well combined. The batter will be quite thin, that's exactly right.
- Rest the Batter: Pour the batter into a bowl or leave it right there in the blender and let it rest at room temperature for 15–20 minutes. This rest allows the flour to hydrate and the batter to slightly thicken. (Make-ahead tip: cover and refrigerate the batter for up to 24 hours, no need to bring it back to room temperature before baking!)
- Preheat & Melt the Butter: Preheat your oven to 400°F (204°C). Place the butter in a 10-inch oven-safe skillet, cast iron is ideal, and slide it into the oven for 5 minutes, just until the butter is fully melted and the pan is hot. Remove the skillet carefully, then use a pastry brush to wipe the melted butter up the sides of the pan, coating every surface. This buttered, hot skillet creates those signature crispy, lacey edges.
- Bake: Pour the rested batter directly into the center of the hot buttered skillet no need to swirl or spread it. Slide it immediately into the oven and bake at 400°F for 15 minutes. Without opening the oven door, reduce the temperature to 350°F (177°C) and continue baking for another 10 minutes, until the edges and center are deeply golden and the pancake has puffed up dramatically over the sides of the pan.
- Finish & Serve: Remove from the oven and watch the magic as the Dutch baby slowly deflates and settles into its final shape. Let it cool in the skillet for 5 minutes, then dust with confectioners’ sugar, pile on your toppings of choice, slice into wedges, and serve directly from the skillet!
Nutrition
Dutch Baby Pancake Ingredients
The beauty of this recipe lies in its simplicity. You likely have these humble, everyday ingredients sitting in your kitchen right now.
- 3 large eggs, at room temperature
- ¾ cup (94g) all-purpose flour
- ¾ cup (180ml) whole milk, at room temperature (any dairy or non-dairy milk works)
- 1 teaspoon lemon zest (or ½ teaspoon ground cinnamon)
- 2 tablespoons (25g) granulated sugar
- ½ teaspoon vanilla extract
- 1 pinch salt
For the Pan:
- 3 tablespoons (43g) unsalted butter
For Serving (Sweet Version):
- 2 tablespoons confectioners’ sugar, for dusting
- Fresh berries, maple syrup, and/or whipped cream
For Serving (Savory Version Optional):
- 2 tablespoons sour cream
- 2 tablespoons fresh chives, chopped
- Halved cherry tomatoes, fresh arugula, smoked salmon

How to Make a Dutch Baby Pancake
Here are the steps to create that glossy, magnificent puff. The technique is straightforward, but taking care with the temperatures and timing makes all the difference!
1. Blend the Batter
Place the eggs in a blender and blend on medium-high speed for about 45 seconds, until they are genuinely frothy and fluffy. Don’t rush this step, as the air you build here is what starts the lift! The mechanical action of the blender works the eggs until they are perfectly light. Next, add the flour, milk, lemon zest, sugar, vanilla, and salt. Blend again until everything is smooth and well combined. The batter will be quite thin; that’s exactly right.
2. Rest the Batter
Pour the batter into a bowl, or leave it in the blender and let it rest at room temperature for 15–20 minutes. This rest allows the flour to hydrate and the batter to slightly thicken. The starches absorb the liquid, giving you a silky texture later. If you want to prep ahead, cover and refrigerate the batter for up to 24 hours. There is no need to bring it back to room temperature before baking, making it incredibly convenient for busy mornings.
3. Preheat & Melt the Butter
Preheat your oven to 400°F (204°C). Place the butter in a 10-inch oven-safe skillet (cast iron is ideal for holding heat), then slide it into the oven for 5 minutes, just until the butter is fully melted and the pan is hot. Remove the skillet carefully, then use a pastry brush to wipe the melted butter up the sides of the pan, coating every surface. This buttered, hot skillet is exactly what creates those signature crispy, lacy edges.
4. Bake for the Dramatic Puff
Pour the rested batter directly into the center of the hot buttered skillet. There is absolutely no need to swirl or spread it; it will settle perfectly on its own. Slide it immediately into the oven and bake at 400°F for 15 minutes. Without opening the oven door (this is crucial for the steam to do its job!), reduce the temperature to 350°F (177°C) and continue baking for another 10 minutes. You are looking for the edges and center to turn deeply golden, and for the pancake to puff dramatically over the sides of the pan.

5. Finish & Serve
Remove from the oven and watch the magic as the Dutch baby slowly deflates and settles into its final shape. It will emerge beautifully wrinkled, golden-rimmed, and ready for your favorite Dutch baby pancake toppings. Let it cool in the skillet for 5 minutes, then dust generously with confectioners’ sugar. Pile on your toppings of choice, slice into wedges, and serve directly from the skillet to keep things rustic and warm!

Tips & Variations for the Perfect Dutch Baby Pancake
My personal preference is to serve this fresh out of the oven with a squeeze of bright lemon and a dusting of powdered sugar, but you can also get incredibly creative here!
- Embrace seasonal flavors: During the fall and winter, search interest peaks for cozy variations. You can easily create a pumpkin, apple, or cinnamon version by folding a dash of warm spices into the batter.
- Dietary swaps: If you’re cooking for specific needs, vegan and gluten-free options are fantastic and growing in popularity. Opt for your favorite 1-to-1 gluten-free flour blend. For dairy-free adaptations, oat milk and almond milk have both been successfully tested in this recipe.
- Adjust for your household: If you are cooking just for two, you can easily halve this recipe and bake it in an 8-inch skillet. Small-batch recipes are perfect for couples and smaller households who want a fresh, hot breakfast without endless leftovers.

Nutrition & Storage Information
Nutritional information is approximate and may vary based on ingredients used. A standard slice generally runs around 220 calories, with 8g of protein and 12g of fat. If you have leftovers, store them in an airtight container in the fridge for up to two days. They won’t retain their crisp edges, but they are still vibrant and tasty when gently warmed in a toaster oven!
What to Serve With Your Oven Pancake
Because this recipe is so versatile, you can take it in either a sweet or savory direction! For a classic sweet brunch, pair it with a fresh fruit salad full of zippy berries, a drizzle of warm maple syrup, or even a dollop of Greek yogurt.
If you prefer savory flavors, you can completely transform the meal. Savory Dutch babies featuring ham, a fried egg, and melted Gruyère cheese tap beautifully into the popular breakfast-for-dinner trend. This approach makes for a high-protein, incredibly satisfying meal. I recommend omitting the sugar and vanilla from the batter if you plan to go the savory route, adding a pinch of black pepper or fresh herbs instead.

Dutch Baby Pancake FAQs
What is a Dutch baby pancake?
A Dutch baby pancake is a large, baked popover-style pancake that cooks in a hot cast-iron skillet. Instead of using chemical leaveners like baking powder or baking soda, it relies entirely on the steam created by a thin, eggy batter hitting a very hot pan. This process creates a wildly puffed, deeply golden crust with a rich, tender center.
Why did my Dutch baby not puff up?
If you are dealing with a Dutch baby that isn’t puffing up, the most common culprits are a lack of heat or a lack of aeration. Make sure your oven is fully preheated and that your skillet is piping hot before you pour the batter in. Additionally, blending the eggs until they are genuinely frothy is critical, as that trapped air provides the initial lift before the steam takes over.
Is a Dutch baby pancake the same as a German pancake?
Yes! A Dutch baby pancake is the same dish as a German pancake recipe. The term “Dutch” is actually a historical corruption of the word “Deutsch” (meaning German). They both refer to this wonderful, oversized, bowl-shaped oven pancake that puffs up beautifully as it bakes.
Conclusion
This recipe truly brings the joy back into weekend breakfasts. It’s incredibly forgiving, surprisingly quick, and delivers a stunning visual presentation without any of the stress of flipping individual portions. Whether you dress it up with vibrant summer berries or transition it into a savory weeknight dinner, it’s a method you’ll return to again and again. I’d love to hear how yours turns out! Leave a comment below with your favorite topping combinations, and happy baking!