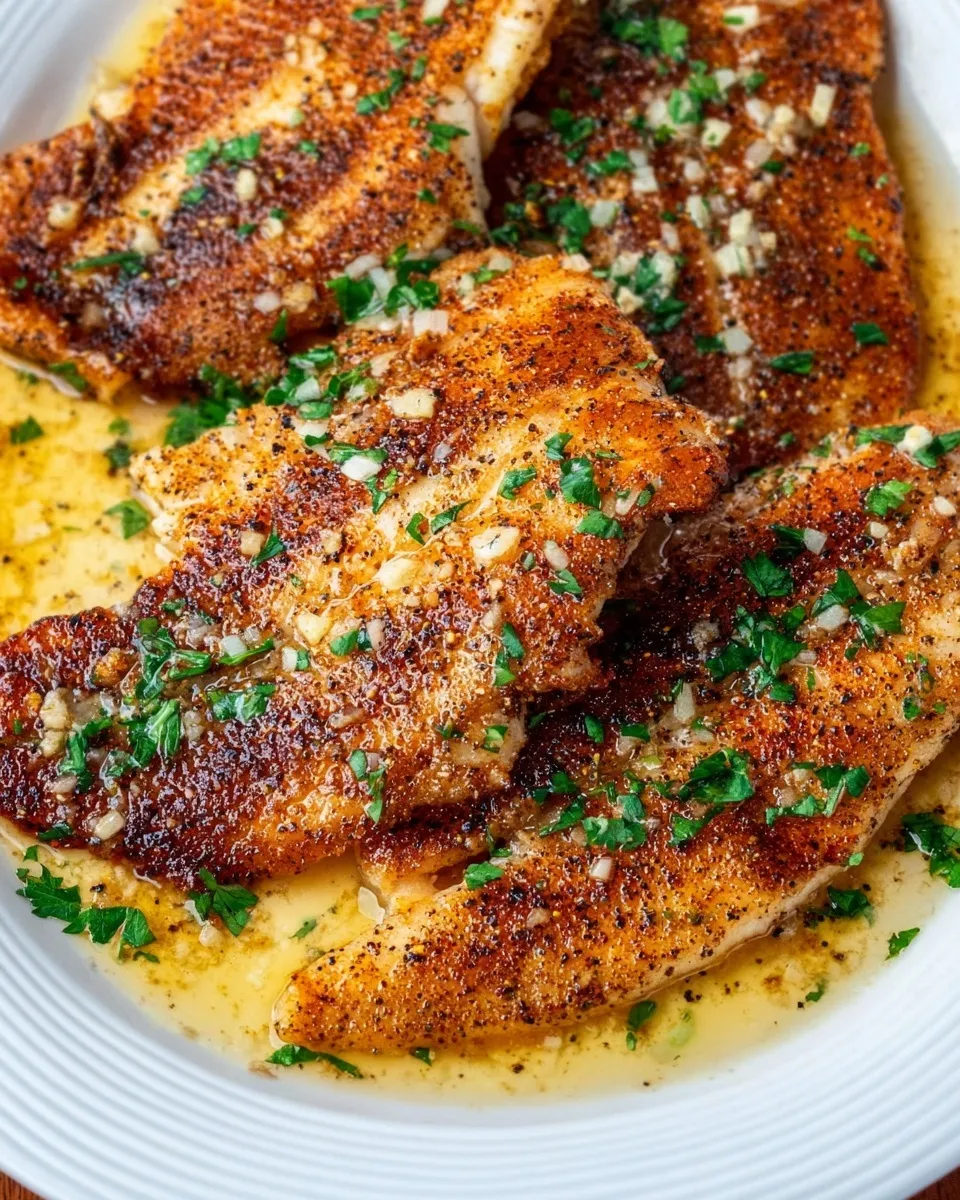
Raise your hand if you’ve ever felt personally victimized by dry, rubbery chicken. We have all been there, chewing through a piece of meat that feels more like a tire than dinner, wondering where it all went wrong. But I have some incredible news: those days are officially behind you!
I honestly used to avoid cooking poultry breasts because I could never get the timing quite right. Then, I discovered the magic of air fryer chicken breast. It was a total lightbulb moment for me. By circulating hot air around the meat, the air fryer creates a gorgeous “seal” that locks in moisture while creating a crave-worthy, golden crust all without turning on the oven or heating the whole kitchen.
This isn’t just another dinner idea; it’s a staple you will want to keep in your back pocket for busy weeknights. You can whip this up in about 20 minutes, and the result is consistently tender, flavorful, and incredibly versatile. Whether you need a quick protein for a salad, a main for a cozy dinner, or a reliable batch for your weekly meal prep, this recipe delivers every single time. Get ready to fall in love with chicken all over again!

Table of Contents
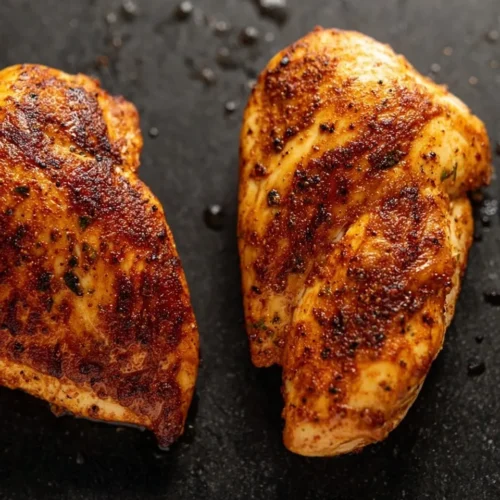
Juicy Air Fryer Chicken Breast
Ingredients
For the Chicken
- 2 boneless skinless chicken breasts (approx. 1 lb / 450g total)
- 1 tbsp avocado oil or olive oil
For the Seasoning Blend
- 1 tsp garlic powder
- 1 tsp smoked paprika
- 1/2 tsp onion powder
- 1/2 tsp dried oregano
- 1/2 tsp kosher salt
- Black pepper to taste
Instructions
- Preheat Air Fryer: Preheat your air fryer to 375°F (190°C) for about 5 minutes.
- Make Seasoning Blend: While the air fryer heats, mix the garlic powder, smoked paprika, onion powder, oregano, salt, and pepper in a small bowl.
- Oil the Chicken: Pat the chicken breasts dry. Brush or rub the avocado oil evenly over both sides of the chicken.
- Season: Sprinkle the seasoning blend generously over the chicken, pressing it gently to adhere to the meat.
- Cook: Place the chicken in the air fryer basket in a single layer. Cook for 18–20 minutes, flipping the chicken halfway through (at the 9 or 10-minute mark).
- Check Temperature: Begin checking the internal temperature a few minutes early. Remove the chicken when it reaches 155-160°F (68-71°C) at the thickest part.
- Rest: Transfer to a plate and let rest for 5–10 minutes to allow juices to redistribute and the internal temperature to reach a safe 165°F (74°C). Serve warm.
Notes
- Quick Cutlet Variation: For faster cooking, slice breasts horizontally into thin cutlets. Cook at 375°F for 10–15 minutes, flipping at the 4-minute mark.
- Storage: Store leftovers in an airtight container in the refrigerator for up to 3–4 days.
- Don’t Overcrowd: Ensure air can circulate freely; cook in batches if your air fryer basket is small.
Nutrition
Ingredients for the Perfect Chicken
Here is everything you need to make this happen. I love that this list is concise and straightforward, relying on pantry staples that you likely already have on hand.

- Boneless, skinless chicken breasts: You’ll need two breasts, totaling about 1 pound (450g). Try to pick pieces that are relatively even in size for consistent cooking.
- Avocado oil or olive oil: You need about one tablespoon. I prefer avocado oil for its higher smoke point, but olive oil works beautifully too.
- Garlic powder: 1 teaspoon provides that savory base we all love.
- Smoked paprika: 1 teaspoon gives it a vibrant color and a subtle, smoky depth.
- Onion powder: 1/2 teaspoon rounds out the savory profile.
- Dried oregano: 1/2 teaspoon adds a lovely, earthy, herbal note.
- Kosher salt: 1/2 teaspoon boosts all the other flavors.
- Black pepper: Add this to taste (optional, but recommended for a little kick).
Step-by-Step Instructions
Get ready, because this process is incredibly straightforward. I’ve broken it down to ensure you achieve that juicy, tender result on your very first try.
1. Preheat and Prep the Seasoning
Start by preheating your air fryer to 375°F (190°C). I like to let it run for about 5 minutes so the Basket is nice and hot when the meat hits it. While that warms up, grab a small bowl and whisk together your garlic powder, smoked paprika, onion powder, oregano, salt, and pepper. Mixing your spices beforehand ensures you get an even flavor distribution. No one wants a mouthful of just garlic powder!
2. Oil the Chicken
Place your chicken breasts on a clean cutting board or a large plate. Using a pastry brush or simply the back of a spoon, coat both sides of each breast evenly with your avocado oil or olive oil. This step is crucial because the oil acts as a binder for the spices, helping the exterior achieve a lovely golden-brown finish.
3. Season Generously
Now for the fun part! Sprinkle your custom seasoning blend evenly over both sides of the chicken. I recommend using your hands to pat the spices into the meat gently. It might look like a lot of seasoning, but trust me, this generous crust is what packs a punch of flavor and distinguishes this from boring, plain poultry.

4. Arrange in the Basket
Once your air fryer is preheated, place the seasoned breasts in the Basket. Ensure they are arranged in a single layer, without overlapping. Air fryers work by circulating hot air, so if the pieces are touching too closely, the air can’t reach those spots, and you might end up with uneven cooking.
5. The Cooking Process
Cook at 375°F (190°C) for 18–20 minutes. About halfway through the cooking time (around the nine or 10-minute mark), pause to flip the chicken. This ensures both sides get that appetizing, seasoned crust. When you open the Basket to flip, you should already see the spices toasting nicely and the edges starting to crisp up.
6. Checking for Doneness
This is the most crucial step in preventing dry meat. Start checking the internal temperature a few minutes before the timer goes off. I highly recommend using an instant-read thermometer. You want to pull the chicken out when it reaches 155-160°F (68-71°C) in the thickest part of the meat.
Why pull it early? The USDA recommends 165°F, but if you wait until it hits that number in the Basket, it will continue cooking while it rests and dry out. Pulling it a little early allows carryover cooking to finish the job perfectly.
7. The Crucial Rest
Transfer the cooked chicken to a clean plate and let it rest for 5–10 minutes. I know it’s tempting to slice right into it while it’s hot and smelling amazing, but patience pays off here! Resting allows the juices to redistribute throughout the meat rather than spilling out onto your cutting board. This simple pause is the secret to a juicy air fryer chicken breast.

Tips, Variations & Serving Suggestions
Cooking is personal, so while I love the recipe exactly as written, I want you to feel confident making it your own. Here are some tricks and twists I’ve discovered along the way.
Secrets to Success
- The Thermometer Rule: If there is one tool that changed my cooking game, it’s the digital meat thermometer. Chicken breast sizes vary wildly, so cooking by time alone is often a guessing game. A thermometer provides confidence and ensures safety.
- Uniformity Matters: If one breast is significantly thicker than the other, you can use a meat mallet to pound the thicker one down slightly. This helps them cook at the same rate, so one isn’t dry while the other is still raw.
- Room Temp is Best: If you have time, let the chicken sit on the counter for 15 minutes before cooking to take the chill off. This helps it cook more evenly through the center.
Tasty Variations
- The “Cutlet” Hack: If you are in a rush, you can slice the breasts horizontally to create thin cutlets. This is my go-to for a fast lunch! You’ll want to cook these for just 10–15 minutes, flipping at the 4-minute mark.
- Switch Up the Flavors: This spice blend is fantastic, but you can totally swap it out. Try a taco seasoning blend for burrito bowls, or lemon pepper for a zippy, fresh taste.
- Add Some Heat: If you like things spicy, throw in a pinch of cayenne pepper or chili flakes to the spice mix.
Storage and Meal Prep
This recipe is a meal prep champion. You can store leftovers in an airtight container in the refrigerator for up to 3–4 days. It actually stays surprisingly moist!
- Freezing: You can also freeze the cooked chicken for up to 3 months. Just let it cool completely, slice it, and store it in freezer-safe bags.
- Reheating: To reheat without drying it out, I suggest using the air fryer again at a lower temperature (around 350°F) for just 3–4 minutes, or gently warming it in the microwave with a damp paper towel over the top.
Nutritional information is approximate and may vary based on specific ingredients and portion sizes used.
What to Serve With Air Fryer Chicken
Since the main dish is so quick and easy, you have plenty of time to whip up some delightful sides. I love pairing this with dishes that bring color and texture to the plate.
- Roasted Vegetables: Since the air fryer is occupied, toss some asparagus or broccoli on a sheet pan in your regular oven, or make a fresh cucumber salad while the chicken cooks. The crisp freshness of a salad balances the savory spices perfectly.
- Fluffy Grains: A side of garlic butter rice, quinoa, or even a creamy risotto makes this feel like a complete, satisfying meal. The chicken juices drip down into the grains, and it is absolutely delicious.
- Pasta Salad: If you are meal prepping, this chicken is the perfect protein topper for a cold pasta salad or a Greek salad with feta and olives.

Frequently Asked Questions
How long do you cook a chicken breast in the air fryer?
For a standard boneless chicken breast (about 8oz), it typically takes 18–20 minutes at 375°F. However, size is the most significant variable here. Thicker breasts take longer, while thin cutlets might only need 10–12 minutes. I always rely on my thermometer to tell me when it’s done rather than the clock.
How to cook chicken breast in an air fryer without drying it out?
The enemies of juicy chicken are overcooking and skipping the oil. Make sure you coat the meat in oil to protect the surface, and crucially, pull the chicken out when it hits 155-160°F. If you wait for 165°F inside the fryer, the carryover heat will push the temperature to 170°F or higher while it rests, which leads to the dry, chalky texture we want to avoid.
Can I cook frozen chicken breast in the air fryer?
You can technically do so, but I recommend thawing it first for optimal texture. If you must cook from frozen, lower the temperature to 360°F and increase the cooking time significantly (usually 25–30 minutes). You will need to check the temperature frequently to ensure the center isn’t still frozen while the outside burns.
You’ve Got This!
This guide helps you feel confident tackling chicken in your air fryer. It really is one of those recipes that feels like a magic trick once you realize how effortless it is. No more stressing over dinner or choking down dry meat, just juicy, flavorful perfection in minutes.
I would love to hear how it turns out for you! Did you try a different spice blend? Did you serve it with something amazing? Please drop a comment below and let me know. Happy cooking!