There is absolutely nothing like the scent of fresh bread wafting through the kitchen, is there? It’s one of those simple pleasures that instantly makes a house feel like a home. But let’s be real for a second, most traditional roll recipes are designed for a crowd, churning out 24 or even 36 rolls at a time. As much as I love carbs, I don’t always need a bakery’s worth of bread on my counter!
That’s precisely why I was inspired to perfect these small-batch overnight yeasted rolls. I wanted a recipe that was perfectly sized for a cozy dinner for two or a small family meal, without the stress of managing a massive batch of dough. Plus, the “overnight” aspect is a total game-changer. You can mix the dough in the evening when things are quiet, let the fridge do the heavy lifting while you sleep, and bake them off fresh the next day. It’s minimal effort for maximum payoff, glossy, golden, pillowy rolls that are totally crave-worthy. Get ready, because you’re about to fall in love with homemade bread all over again!

Table of Contents
Easy Small Batch Overnight Yeasted Rolls
Ingredients
For the Rolls:
- ⅓ cup warm water 105-115°F
- 2 teaspoons active dry yeast
- 1 tablespoon granulated sugar
- 1 cup all-purpose flour plus ¼ cup additional for kneading
- ½ teaspoon salt
- 1 large egg beaten
- 1½ tablespoons extra virgin olive oil
For Finishing:
- 2 tablespoons butter melted
Instructions
- Activate the Yeast: In a small bowl, combine warm water, sugar, and yeast. Stir quickly and let sit for 5 minutes until foamy and bubbly.
- Mix & Knead: In a mixer (or bowl), combine 1 cup flour, salt, beaten egg, olive oil, and the yeast mixture. Knead for 5 minutes until smooth and elastic. If sticky, add remaining flour 1 tablespoon at a time until the dough is tacky but manageable.
- Shape & Rise: Divide dough into 4 equal pieces and shape into smooth balls. Place in a greased small baking dish (6-inch is perfect). Cover tightly and refrigerate overnight (8-12 hours).
- Prepare to Bake: Remove dough from the fridge 30–45 minutes before baking to let it come to room temperature and puff up. Preheat oven to 400°F.
- Bake: Bake for 12–15 minutes until tops are golden brown and rolls sound hollow when tapped.
- Finish: Brush generously with melted butter immediately after removing from the oven for a glossy, soft crust. Serve warm!
Notes
- Speed it up: If you can’t wait overnight, let them rise in a warm spot for about 30 minutes until doubled, then bake.
- Substitutions: You can swap the sugar for honey for a subtle floral sweetness.
- Storage: Store leftovers in an airtight container at room temperature for up to 2 days.
Nutrition
Ingredients for Small Batch Rolls
Here is everything you need to whip up this small batch. You likely already have most of these pantry staples.

For the Rolls:
- Active dry yeast: You’ll need two teaspoons.
- Warm water: Measured at roughly ⅓ cup (aim for 105-115°F to keep the yeast happy).
- Granulated sugar: 1 tablespoon to feed the yeast.
- All-purpose flour: 1 cup to start, plus about ¼ cup extra on standby for kneading.
- Salt: ½ teaspoon to balance the flavors.
- Large egg: Beaten; this enriches the dough.
- Extra virgin olive oil: 1½ tablespoons for a tender crumb.
For Finishing:
- Butter: 2 tablespoons, melted, for that irresistible golden shine.
How to Make Small-Batch Overnight Dinner Rolls
Get ready, because making bread is easier than you think! Here are the steps to fresh-baked perfection.
1. Activate the Yeast
First, we need to wake up our yeast. Pour the warm water into a small bowl. You want it between 105-115°F, which is about bathwater temperature, not boiling. Add the sugar and the active dry yeast. Stir the mixture quickly to combine, then let it sit undisturbed for about 5 minutes. You’re looking for the mixture to become foamy and bubbly. This is the “bloom,” which indicates that your yeast is alive and ready to work its magic.
2. Mix and Knead the Dough
In the bowl of a stand mixer fitted with a dough hook (or a large mixing bowl if you’re working by hand), combine 1 cup of the flour, the salt, the beaten egg, the olive oil, and the bubbly yeast mixture.
Turn the mixer to medium speed and let it knead for about 5 minutes. You want the dough to become smooth and elastic. Here is where you need to trust your instincts: if the dough feels too wet or sticky, gradually add the remaining ¼ cup of flour, just one tablespoon at a time. You are looking for a consistency that is slightly sticky but manageable. It should pull away from the sides of the bowl but still feel slightly tacky to the touch.

3. Shape and The Overnight Rise

This is where the “overnight” magic happens! Lightly grease a small square or rectangular baking dish (a 6-inch pan is ideal). Turn your dough out onto a lightly floured surface and divide it into four equal pieces. Gently shape each piece into a smooth ball by tucking the edges underneath and rolling them between your palms to create surface tension.
Place the dough balls into your prepared baking dish. Cover the dish tightly with plastic wrap. Now, pop the dish into the refrigerator and let it rest overnight (8 to 12 hours). The cold temperature slows down the yeast, allowing the flavor to develop deeply while the dough rises slowly.
(Note: If you are in a rush and want to bake immediately, you can skip the fridge and let them rise in a warm, draft-free spot for about 30 minutes, until they’ve almost doubled in size. However, the overnight flavor is worth the wait!)

4. Bake to Golden Perfection
The next day, take your rolls out of the fridge about 30-45 minutes before baking to let them come to room temperature and finish puffing up. Preheat your oven to 400°F.
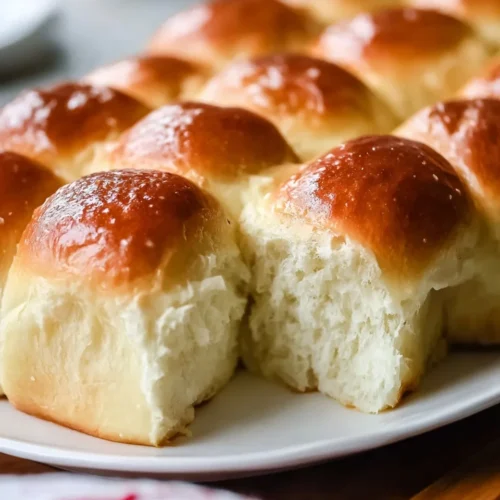
Once the rolls have lost their chill and look puffy, transfer the uncovered baking dish to the oven. Bake for 12–15 minutes. You are looking for tops that are beautifully golden brown. If you tap on one gently, it should sound hollow.
5. Finish and Serve
Remove the rolls from the oven. While they are still piping hot, brush the tops generously with the melted butter. The butter soaks into the warm crust, creating a glossy, decadent finish that makes these rolls totally crave-worthy. Serve them immediately while warm!

Tips & Variations for Perfect Rolls
I’ve made these small-batch overnight yeasted rolls more times than I can count, and I’ve learned a few tricks along the way to ensure they come out perfectly every time.
- Room Temperature Matters: When you pull the dough out of the fridge the next day, don’t rush the warmup process. Cold dough hitting a hot oven can sometimes result in dense rolls. Give them 30-45 minutes on the counter to wake up!
- Garlic Herb Variation: If you want to switch things up, try adding ½ teaspoon of garlic powder and a teaspoon of dried rosemary or thyme to the flour mixture in Step 2. It brings a bold, zippy flavor that pairs perfectly with pasta nights.
- Honey Butter Option: For a slightly sweeter roll that tastes as if it came from a steakhouse, substitute the tablespoon of sugar in the dough for honey. Then, mix a little honey into your melted butter for the final brushing. It’s absolutely delicious.
- Nutritional Note: Per serving, these rolls typically contain approximately 180-200 calories, with 4g of protein. However, nutritional information is approximate and may vary depending on the ingredients used.
- Storage: These are best enjoyed fresh, but leftovers can be stored in an airtight container at room temperature for up to 2 days. To reheat, wrap them in foil and warm them in the oven for 5 minutes.
What to Serve With Your Rolls
One of the best things about these small-batch rolls for two is their versatility. Because they aren’t overwhelmingly large, they fit into almost any meal plan.
I personally love serving these alongside a cozy bowl of tomato basil soup or a hearty beef stew. The sturdy crumb is perfect for dunking! They are also fantastic with a simple roast chicken dinner; you can use the rolls to sop up the gravy.
If you happen to have leftovers (which is rare in my house!), They make incredible sliders for lunch the next day. Or, split them open, toast them, and slather with jam for a quick breakfast. Since this is a make-ahead dinner roll recipe, it’s also a stress-free addition to a smaller Thanksgiving or holiday gathering where you don’t need a mountain of leftovers.
Frequently Asked Questions
Can I let dinner rolls rise overnight?
Yes, absolutely! Letting the shaped rolls rise in the refrigerator overnight (often called a “cold retard”) actually improves the flavor and texture of the bread. Just make sure they are covered tightly so they don’t dry out.
Can I use instant yeast instead of active dry?
You sure can. If you opt for instant yeast, you can technically skip the “activation” step in the water and sugar and just mix everything. However, I still like to bloom it to ensure my yeast is fresh and active before I waste my flour!
Can I double this small batch recipe?
Definitely, if you have guests coming over, you can easily double the ingredients to make eight rolls. You might need to use a slightly larger mixing bowl and a larger baking dish (like a 9-inch round pan or square brownie pan).
Conclusion
This recipe convinces you that fresh, homemade bread doesn’t have to be a high-stress, all-day project. With these small-batch overnight yeasted rolls, you can enjoy the process of baking without the overwhelm of a massive yield. Whether you are baking for a quiet date night or just treating yourself to something special, these rolls deliver big flavor with minimal fuss.
I’d love to hear how they turn out for you! Did you try a fun variation or stick to the classic butter glaze? Let me know in the comments below. Happy baking!